Minitel Server

CHAPTER 1 : INTRODUCTION
The adventure started after I bought a Telic Minitel 1.
Unfortunately I quickly realized that it was not possible to use it as such without a phone and it had no " returned " mode.
Even using it as a Linux terminal is not possible due to the lack of a function button.
Now I had to find another Minitel to have some fun.
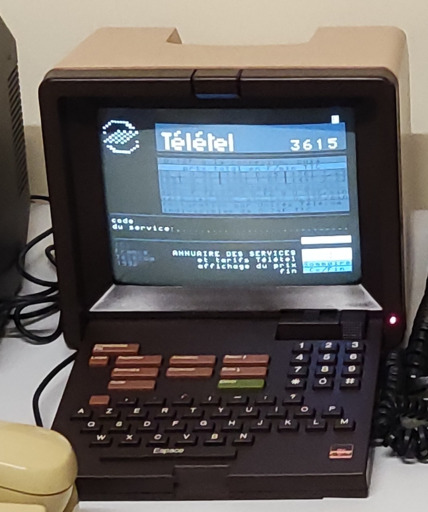
At this moment, the desire to make a server was not yet present, I just wished to acquire a Minitel to use it to contact the server 3614 HACKER (Accessible at 09.72.52.72.52).
So I started looking for a new model.
I finally got my hands on an Alcatel Minitel 12:
This model has two elements:
- A screen
- A telephone handset with its keyboard
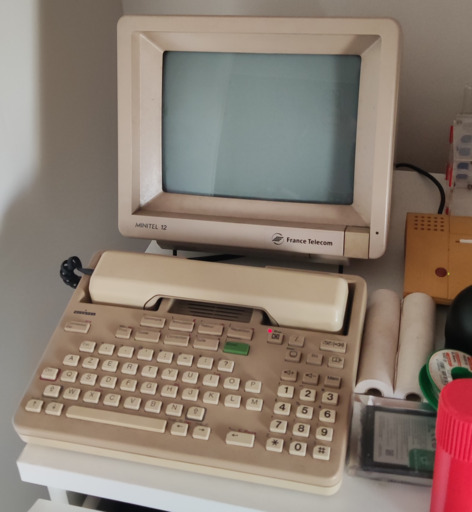
As a single Minitel 12 was not enough for me, I decided to buy a Minitel 12 Philips:
Did you know : The Minitel 12 has an internal messaging system that allows you to leave a message (a kind of mail) if the called person does not answer after 3, 5 or 7 rings.
It is even possible to pick up the phone during this operation (if, for example, you have run from the other end of your house/apartment and tripped over the cat lying in the middle of the room), this will stop the messaging system and return to a normal call (with a few scratches as a bonus, you know, the cat)
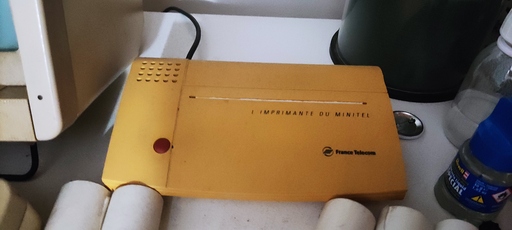
Another possibility, if you have a thermal printer connected to the péri-informatique port, the message will print when the caller hangs up his Minitel (option to be activated).
It is not necessary to have a Minitel 12 as a call sender to leave a message on a Minitel 12 recipient.
An other model, a really special one, has also been acquired by Aros :
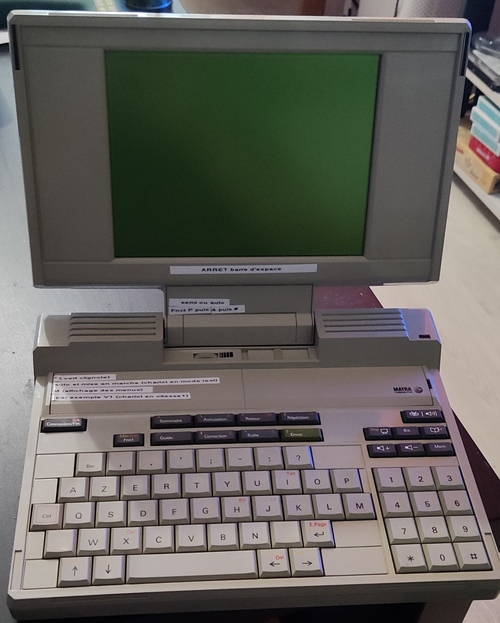
It is the first and the only “portable” Minitel approved by the French Government.
We can power it via a 12V adapter, a battery (wich is composed by 4 LR06 Ni-Cd elements), or 4 alcaline LR06 batteries.
It can use a basic phone line to be connected to the RTC network, OR, the wireless system named Radiocom 2000
I’ll use this one as it is light and simple to setup.
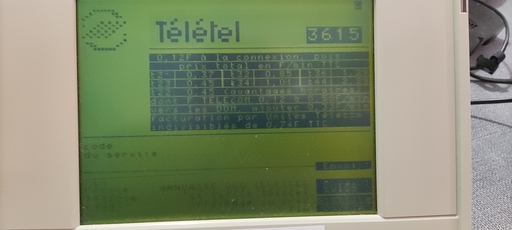
I can finally test the connection and discover this old technology ;P.
We pick up the handset, we enter the number and we wait for the BIIIIIP to initiate the connection. And there, the home page loads. Victory!

From this discovery, I started to look for a way to host a videotext service myself.
Other experiences with cLx allowed me to learn more about analog telephony and the v.23 protocol.
Chapter 2 : Reflection and experimentation
It is now time to take the plunge and look for a way to emulate a videotext service on a recent server.
In the past, services were developed on old computers, such as Apple II, and could be hosted on these same machines.
Today it is possible to find them on some second-hand sites, for a few hundred euros. This solves the application problem but not the communication part.
Unless you have a PBX at home, the easiest way to deploy a telephone network is via VoIP.
The advantages are the ease of installation and that it does not take many resources (a Raspberry Pi is enough). The disadvantages are that it requires expensive hardware (brand new) to connect analog hardware on our VoIP network and the problems brought by the compression of the audio stream via codecs (and thus of the data transiting in V.23).
I then start some research on the Asterisk IPBX server. For that I set up a small internal network with VoIP clients and SIP accounts.
My first tests are basic calls to understand the interconnection between the SIP accounts and the commutation according to the dialing. Each number is assigned a kind of routine to execute.
We can then add the SIP account(s) that we want to contact.
Everything is functional and it is with the few knowledge acquired on the tool that I start looking for a software server allowing to emulate a videotext service.
This is where I find the beautiful Minitel-Server soft, developed by BwanaFR inspired by Pynitel developed by cquest.
This software, developed in python, allows to open a videotext service on a given port. For example, if it detects a folder with the name 3614, it will run a TCP videotext server on port 3614 in localhost.
Minitel-Server is provided with 3 directories:

Now that we have the application it remains to link the TCP part to the VoIP part. For this there is the Asterisk SoftModem plugin.
As a SIP account, we indicate in the dial plan of Asterisk, such number called will contact a “softmodem” on the port XXXX.
In the previous example, we create a numbering plan such as :
- If call received on 3615
- Answer after 1 tone
- Contact the 3615 SoftModem
- Hang up

You can also define variables in the numbering plan.
For example:
- If call received on 36XX
- Answer after 1 tone
- Contact the SoftModel 36XX
- Hang up

This avoids creating a call plan for each SoftModem, and thus not having to reload the Asterisk configuration constantly when adding a videotext service.
Well now it’s difficult to know if the server is fully functional. I have checked everything, applied the right codec (g711 ulaw), called the server with the number 3615 and we can hear the biiiiiiip that tells us to connect the Minitel. But for the moment I have no way to connect my analog devices on my VoIP network.
So I take the opportunity to go on the Internet and find a box that allows me to connect these old analog devices on a digital network.
The device in question is called an ATA for Analog Terminal Adapter and allows to connect X analog lines to X SIP accounts. So I invested in 4 Linksys PAP2T ATAs:
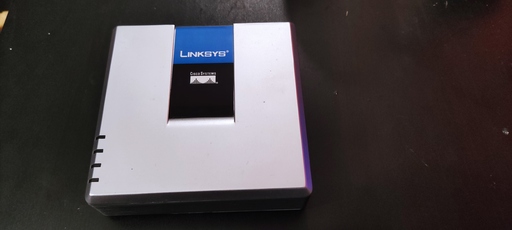
They can be found around 20€ second hand. They are easily configurable and have two analog lines. The only problem is that they heat up quite quickly and strongly, so it is not recommended to stack them.
An important thing to do on these devices is to disable all echo cancellation functions. The manipulations to be done are to be found here
Now that everything is functional, I can plug in a Minitel 12 and test a call from a VoIP client.
The handset rings, I pick it up and I hear myself. VICTORY
Now we switch to two Minitel 12 connected to the ATA, each line is attached to a different SIP account. I pick up one of the two handsets, dial the number associated with the other one and let it ring (to get the Minitel “mail box”). After 3 rings I hear the clac of the relay (on the other device) and then the audio track announcing that we are in relation with a Minitel “mail box”. At the long Biiiiiip I launch the videotext connection and there, the screen correctly displays the menu.

Second victory. My VoIP network is working, my ATA are working properly, the codec used is correct and does not cause any problems with the demodulation of the signal. Everything is perfect.
Next step, test the connection to the SoftModem. I connect a Minitel to the ATA and dial 3615. The carrier is heard, I click on Connection/End, and there, the page is displayed. VICTORY N°3
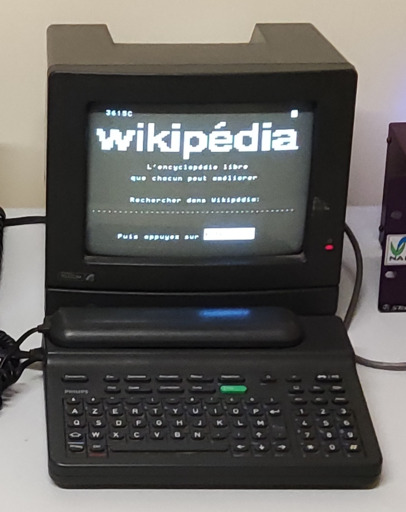
Everything works! I can now learn about the methods of designing a static (just the vdt file) and dynamic (with a yaml file and its python script) Videotext page.
But for now I will put the server online and make it available with a SIP account generated on demand. This allows me to move around with my ATA and wake up the nostalgia of some people.
For more mobility, cLx has created a cable that allows you to connect a phone to the Radiocom2000 socket of a Minitel 5. Then you just have to contact the Asterisk server via a VoIP client (the GSM codec does not like V.23 signals).
CHAPTER 3 : Creation of a Minitel page (Soon!)
Thanks
Thanks to :
- Aros for the use of his Minitel 5 <3
- cLx for having thrown me in the bath with his Minitel 5 (which was out of order), his research and his HUGE work on the analysis of this atypical machine (visible on his Git HERE)
- Kay for being my test subject in the creation of the Asterisk server and its access to the public network.