Film Photography
SOMMAIRE⌗
- CHAPITRE 0 : Introduction
- CHAPTER 1: Theory
- CHAPTER 2: Photography
- CHAPTER 3: Developing
- CHAPTER 4: Costs
- SOURCES AND USEFUL LINKS
CHAPTER 0 : Introduction⌗
I’ve been experimenting with film photography since early 2025, it was a spur-of-the-moment decision, using a Nikon F80 and my father’s Kodak Ektra 22.
I took advantage of a convention to do my first test shots and photo sessions before sending the film off to be developed.
Then I looked into developing film at home, and despite my initial apprehensions, it went very smoothly.
The process seemed very complex, but black-and-white photography leaves plenty of room for small mistakes.
I then took advantage of other events here and there to familiarize myself with the camera’s settings. I tried out different things with overexposure and made my first mistakes.
So I’m drawing on my experience and my ongoing research to put together a slideshow, which I present during panel discussions at conventions, to inspire others.
So today I’m sharing this article, which puts that presentation into writing, including all the details I might forget when speaking.
Unfortunately, there won’t be a video demonstration of black-and-white development. I’ll have to save that part exclusively for future panel discussions.
CHAPTER 1: Theory⌗
This is where we will cover all the theoretical aspects of film photography. From chemical reactions to the exposure triangle.
Chemistry⌗
Film is made up of several layers:
- A transparent protective top coat
- A light-sensitive emulsion layer (or 3 layers for color)
- A dark anti-halation layer
- A firmer base layer to keep the film flat
We will focus on the light-sensitive layer.
This layer is composed of silver halides AgBr. More specifically, bromide ions Br⁻ and silver ions Ag⁺.
But how does it work?
Exposure⌗
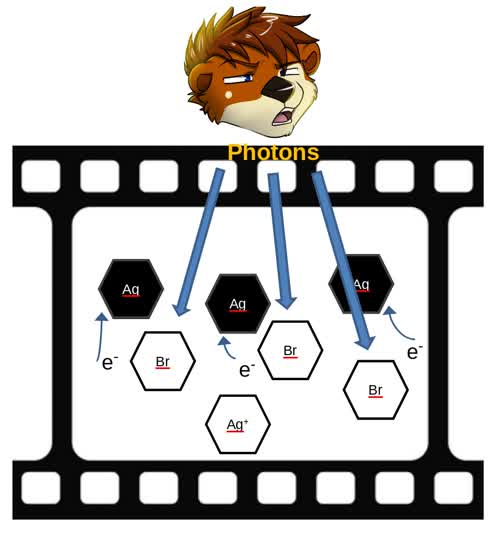
As shown above, capturing an image on film involves several steps:
- First, the subject reflects photons toward the lens. These photons reach the emulsion.
- Each photon absorbed by a bromide ion releases an electron e⁻.
- This electron is captured by a nearby silver ion, turning it into a silver atom.
Br⁻ + hv -> Br⁰ + e⁻
Ag⁺ + e⁻ -> Ag⁰
The reaction is now stabilized and can no longer be altered by light. It will require development for these atoms to be transformed further.
The dispersion of crystal clusters across the emulsion means that photons will have varying success in hitting a bromide ion.
Taking a gradient from white to black as an example, the rendering on film will not be completely smooth. You will see areas that were “missed” by photons.

Becomes

Sensitivity (ISO/ASA)⌗
Film rolls are produced in various speeds (sensitivities) using the same underlying formula.
This is controlled by adjusting the size of the crystal clusters. The finer these crystals are, the more photons are needed to saturate them. Conversely, the larger they are, the less light is required to expose an image.
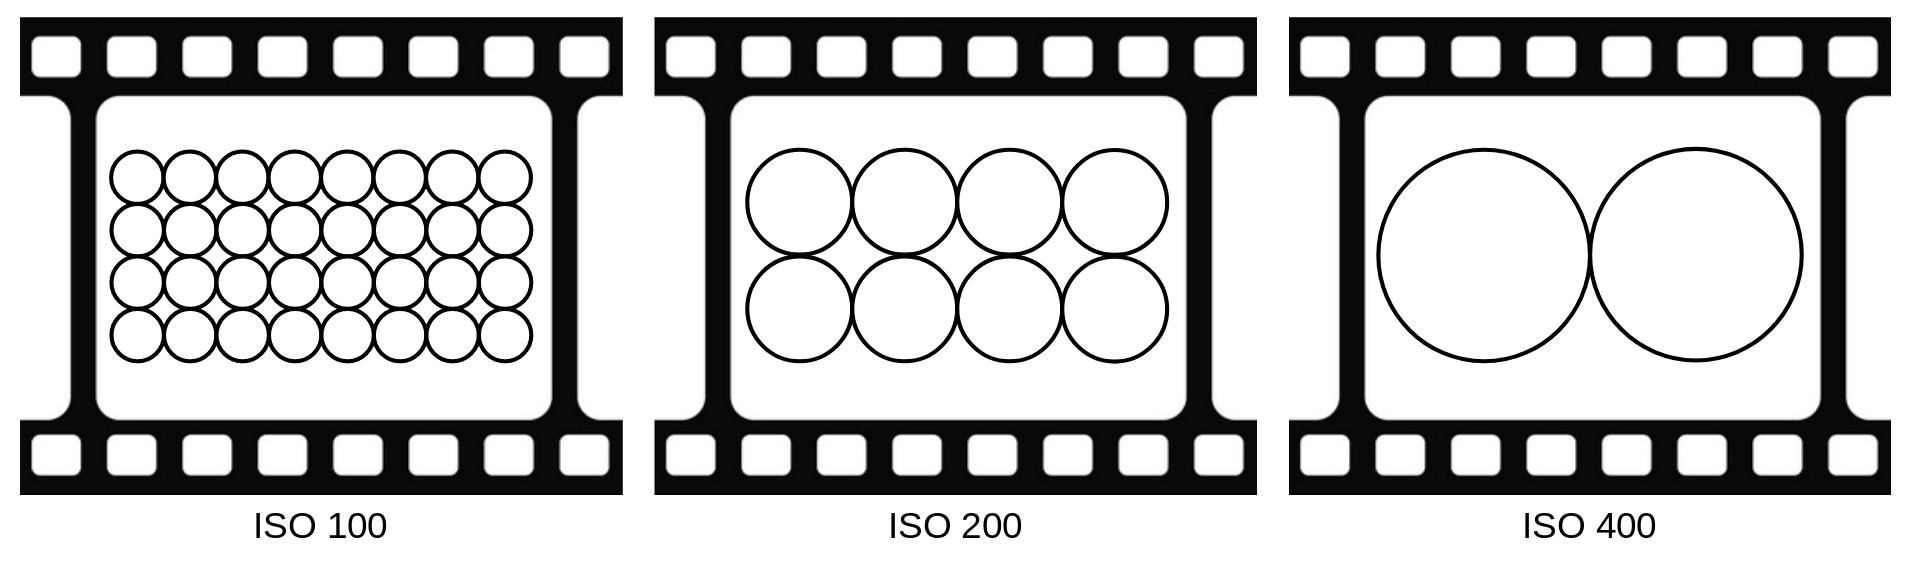
On the emulsion, once developed, these clusters will be more or less visible to the naked eye. This is what we call Grain.
By analogy with digital photography, this corresponds to sensor noise.
Fundamentals⌗
Now let’s move on to the fundamentals of photography.
This section is useful not only for understanding how to manage the light reaching our film, but also for achieving the desired look in an image.
The following information is not limited to film photography; it is equally useful in digital photography.
We are going to talk about a triangle. And not just any triangle.
The EXPOSURE TRIANGLE
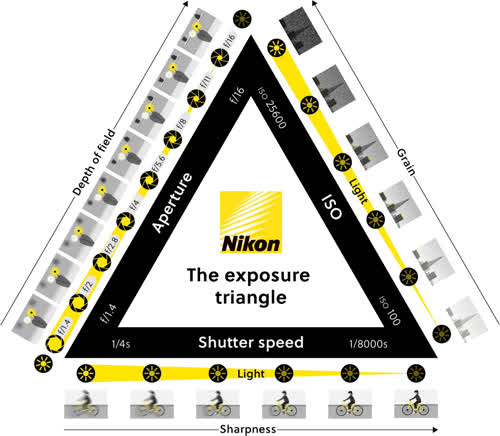
This triangle represents the 3 settings we can adjust to modify the amount of light captured by the film.
ISO⌗
As mentioned in the Chemistry section, film comes in different sensitivity speeds:
50 / 100 / 200 / 400 / 800 / 1600 / 3200 ISO
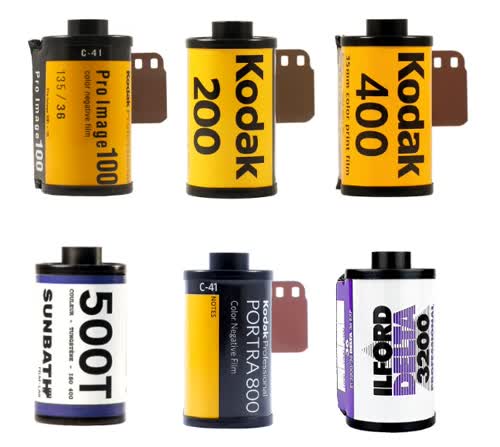
Therefore, it is impossible to change this parameter on the fly without changing the roll of film.
However, it is possible to set a different ISO value on the camera:
- Lower than the film: the camera will let in more light (overexposure).
- Higher than the film: the camera will let in less light (underexposure).
This use case often arises when using film that expired several years ago. A common rule of thumb is to overexpose by one stop (halving the ISO) for every decade since expiration.
You can also choose to intentionally overexpose film for example, with brands like Fomapan, where it is often recommended to shoot 400 ISO film at 200 ISO.
Shutter Speed⌗
The second parameter on the list is shutter speed.
It is expressed in seconds, most commonly as fractions of a second.
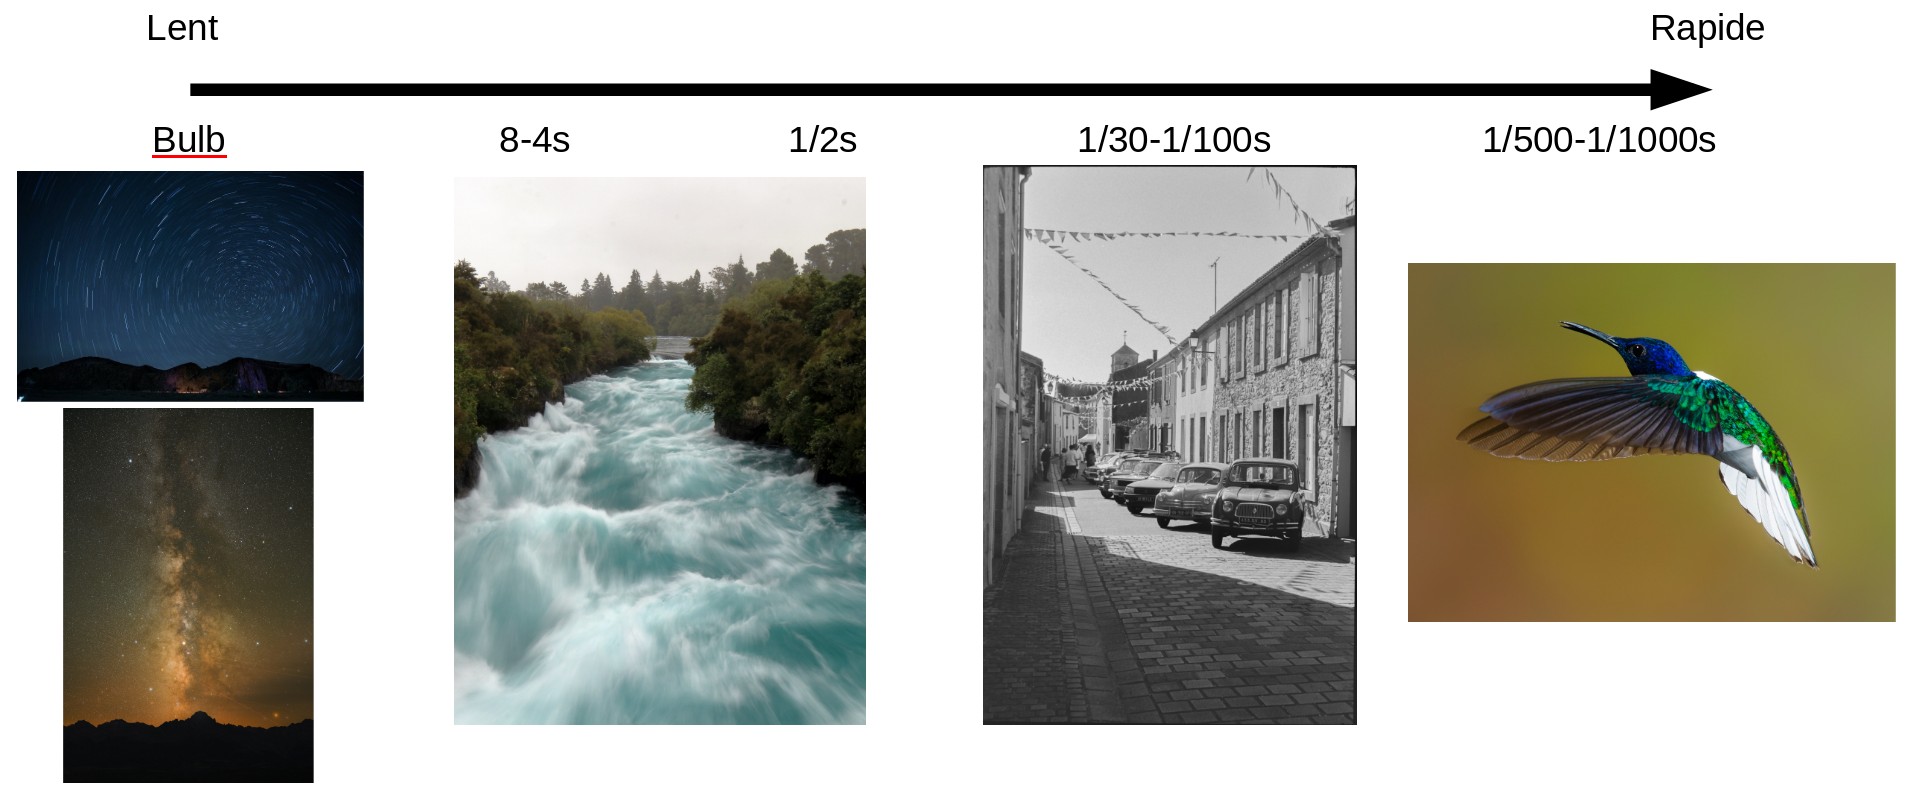
There are various use cases for different shutter speeds:
- Bulb: The slowest speed, where you decide when to close the shutter. Used for artistic compositions such as light painting.
- 12s to 4s: Used for astrophotography capturing star trails or the Milky Way.
- 4s to 1/2s: Creative motion blur in your composition, such as a waterfall or a rushing stream.
- 1/30s to 1/100s: Ideal for sharp handheld shots of stationary subjects.
- 1/500s to 1/1000s+: For moving or fast-moving subjects (wildlife, sports).
Here is a visual reference illustrating speeds from slow to fast:
TIP: You can determine the minimum shutter speed needed to avoid camera shake when handholding.
Simply take the focal length displayed in mm on the lens and convert it to a reciprocal fraction of a second.
For a 50mm lens, you should shoot handheld at a minimum speed of 1/50s.
Aperture⌗
The final parameter, which depends on your lens, is the aperture.
Indicated as an f-number on the lens barrel, it usually specifies the maximum (brightest) setting.
Here, the lower the f-number, the more light reaches the sensor/film.
Aperture is controlled by the closing of the diaphragm blades, making it adjustable in steps up to the lens’s maximum closed aperture.
Aperture has a secondary effect that directly impacts the image’s creative look: depth of field, which dictates how much of the scene is in sharp focus.
The wider open the aperture (lower f-number), the shallower the focus area.
Conversely, the smaller the aperture (higher f-number), the wider the depth of field.
Here are two side-by-side examples captured with a digital camera to illustrate:
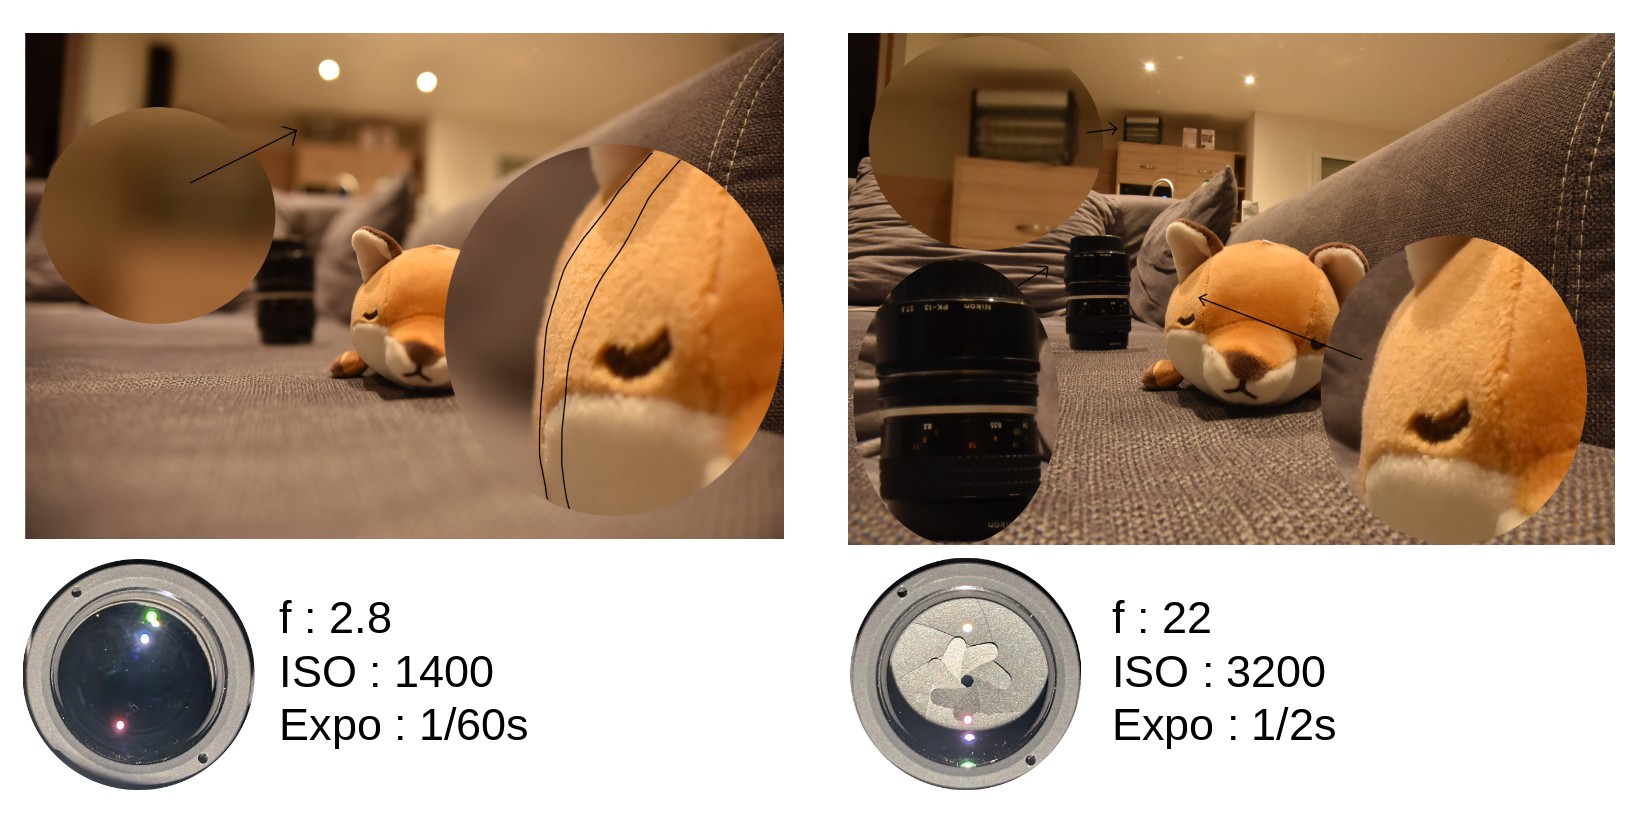
Here you can clearly see the difference in the focused area on the plush toy.
Between f/2.8 and f/22, detail is gained on the camera resting further back, and background elements become recognizable.
Regarding light, the camera had to compensate with other settings:
- ISO: from 1400 to 3200
- Shutter speed: 1/60s to 1/2s
We can calculate the overall light loss as:
- ISO: 1 stop increase
- Shutter speed: 5 stops slower
- Total: 6 stops difference (a factor of 2⁶ = 64)
While you might be tempted to use a wider aperture to maximize incoming light, you risk getting a lot of background blur (shallow depth of field).
Great for a portrait, but not ideal for a landscape.
CHAPTER 2: Photography⌗
The theoretical part is now far behind us, so we can dive into the hardware aspect of film photography.
Formats⌗
First off, the film format you will be using.
The market is filled with various film formats.
All are more or less affordable, depending on your intended use and budget.
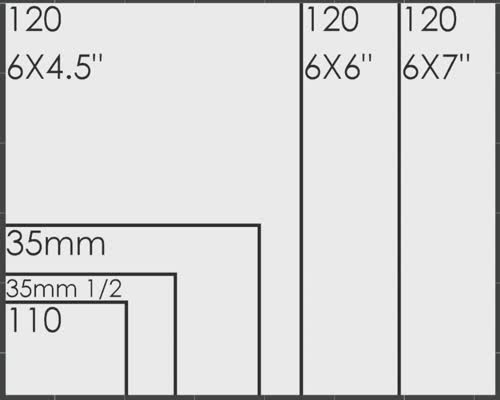
Here is a quick overview of the most popular formats:
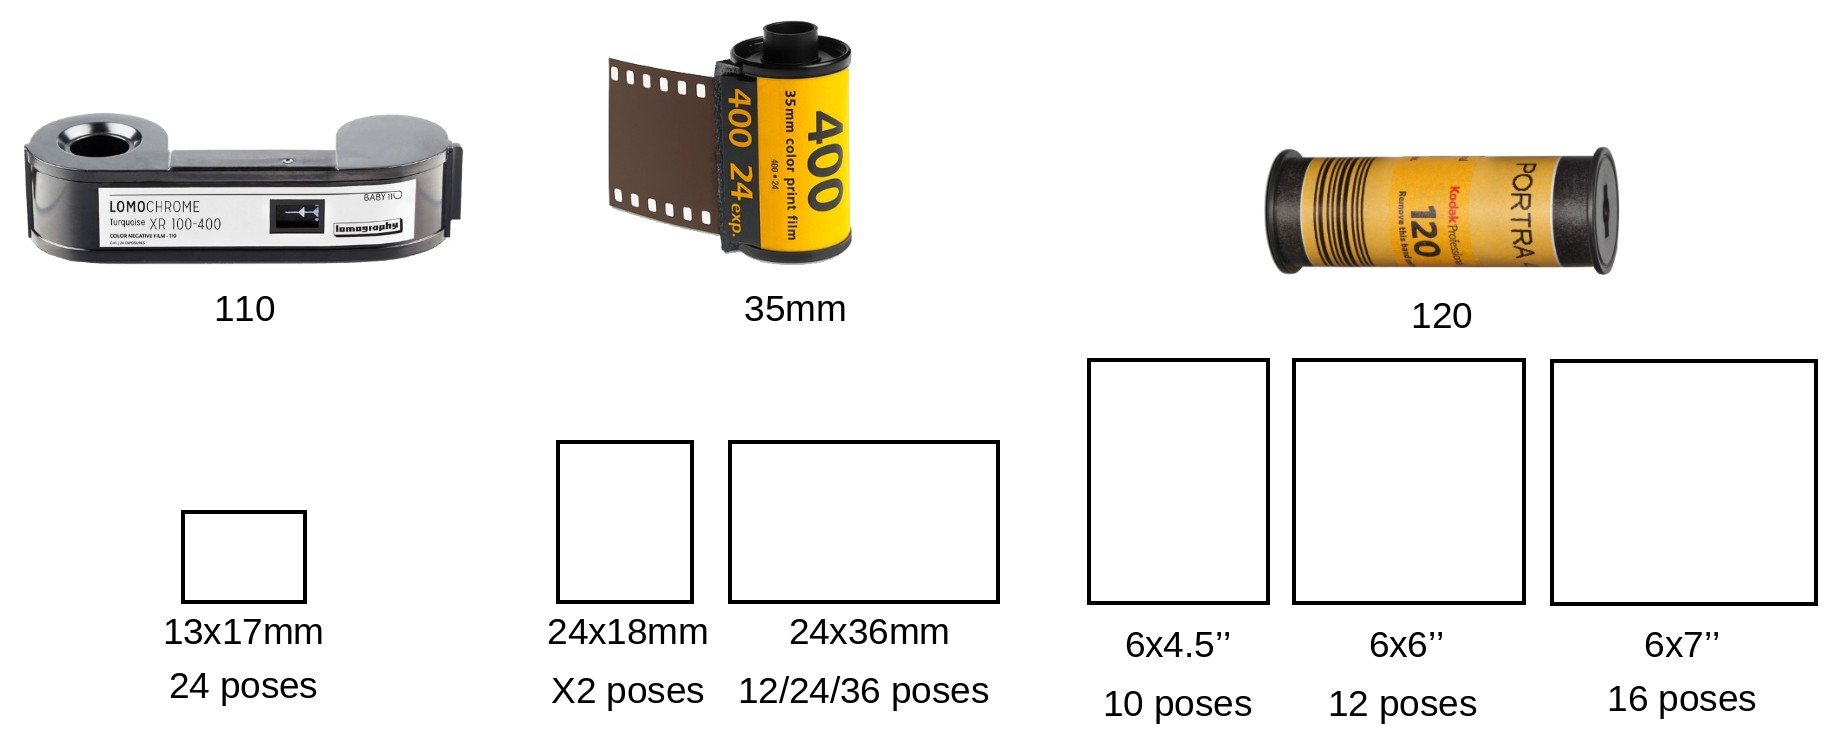
We find:
- The standard 35mm and its half-frame variant, created a bit later, which doubles the number of shots taken at the expense of image quality.
- The 110 format, which was also an economical format for its era, allowing for miniature cameras.
- The 120 format, which opens the door to medium format cameras and their high resolution.
For comparison with digital photography, here is an equivalence table in Megapixels depending on the film format and its sensitivity (as seen in the chemistry section, the higher the sensitivity, the larger the crystal grain):
| FILM | 100 ISO | 400 ISO |
|---|---|---|
| 110 | 5-6 Mpx | 2-3 Mpx |
| 35 1/2 | 10-12 Mpx | 5-8 Mpx |
| 35 | 20-24 Mpx | 10-15 Mpx |
| 120 6x4.5" | 55-65 Mpx | 30-40 Mpx |
| 120 6x6" | 75-90 Mpx | 40-50 Mpx |
| 120 6x7" | 90-105 Mpx | 55-65 Mpx |
If we overlay all these formats at the same scale, we get this diagram:
Cameras⌗
Now that we know the different formats, we can select our camera.
There are several types of cameras available, featuring older or newer technologies.
Point and Shoot⌗
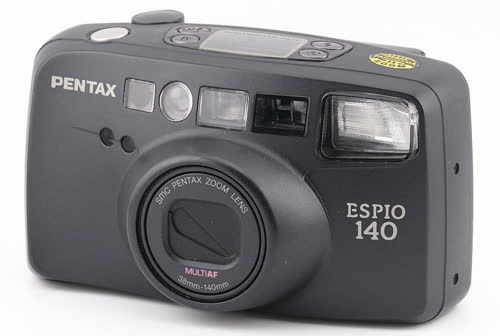
The Point & Shoot is the most affordable camera in this selection.
This is reflected in its build quality and materials.
Made primarily of plastic, it is built to be cheap and lightweight rather than robust.
Its main advantages are:
- Price
- Ease of use
- Compactness
- Autofocus
- Built-in zoom on certain models
Twin Lens Reflex (TLR)⌗
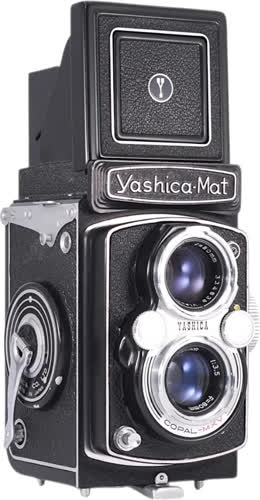
The Twin Lens Reflex (TLR) is the oldest camera type among the 4 we will cover.
It is completely mechanical and offers no advanced features.
The most advanced models feature a built-in meter that reads light through the lens area.
Its main advantage is viewing through a second lens: you see what you are about to shoot.
However, there are several downsides:
- Limited features (no zoom, no autofocus)
- Very expensive (many famous vintage brands)
- Requires 2 lenses if you want to switch focal lengths
- Restricted to 120 film format
- Fully manual; not beginner-friendly
- Heavy
Rangefinder⌗
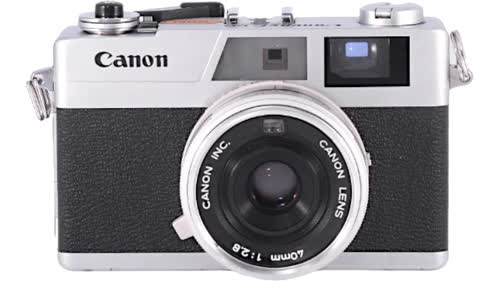
The rangefinder is a fairly compact type of camera that can feature modern functions.
However, they have become financially inaccessible due to trends driven by social media.
Some models have doubled or even tripled in price in the span of a single year.
Key advantages include:
- Ease of use
- Many features (autofocus, flash)
- Interchangeable lenses
- Compact format
- Robust build
Single Lens Reflex (SLR)⌗
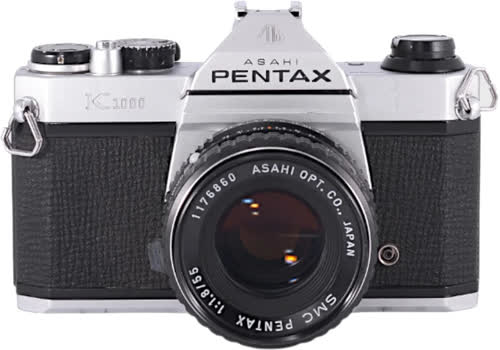
Finally, the last on the list and the most widespread: the single lens reflex (SLR).
Its design builds on the reflex concept, using a mirror that allows you to look directly through the taking lens via the viewfinder.
In my opinion, it is the best camera for beginners: you get all the manual control of older models alongside automatic options for priority modes (aperture or shutter priority).
Pros include:
- Direct TTL (through-the-lens) viewing
- Advanced feature set
- Interchangeable lenses
- Autofocus options
- Great value for money and durability
However, it can be bulky and noisy due to the mirror flap mechanism.
Essential Tools⌗
After picking your camera, we can now list all the essential tools you will need to start shooting.
Batteries⌗
First, the most important and obvious item: batteries!
Several battery types are used in film cameras. The most common are:
- LR44 (button cells)
- CR123 (3V Lithium)
- AA (standard 1.5V)
Without batteries, there is no film advance motor or light metering.
Film Canisters / Cases⌗
Next, film canisters/cases.
It is tempting to throw them away once the roll is loaded into the camera, but make sure to keep them. Usually, you won’t develop your photos immediately, and storing film in its canister protects it from light and moisture.
Film Retriever / Extractor⌗
Another indispensable tool is the film retriever:
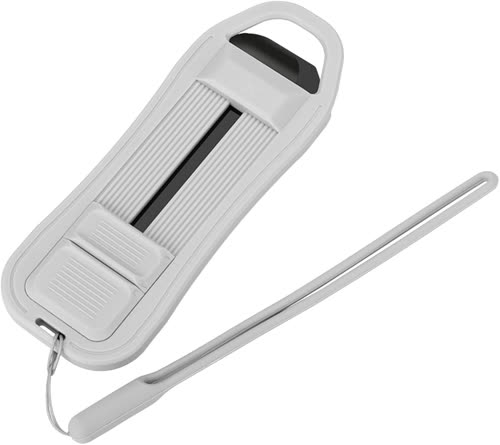
This tool can come in handy and even save your roll.
It serves multiple purposes:
Case #1 (Oopsie): You accidentally rewind your leader into the cassette while loading (camera glitch, accidentally turning the rewind crank). You can retrieve the film leader with your extractor and reload it into your camera.
Case #2 (Save / Load): You decide to switch films mid-roll (Color to B&W, or a different ISO). Rewind, write down the number of frames already shot, and load your new roll. Later, you can pull out the first film again and resume shooting provided you shoot the recorded number of frames + 1 with the lens cap ON.
Darkroom Changing Bag⌗
Just like the film retriever, a changing bag can save your shots.
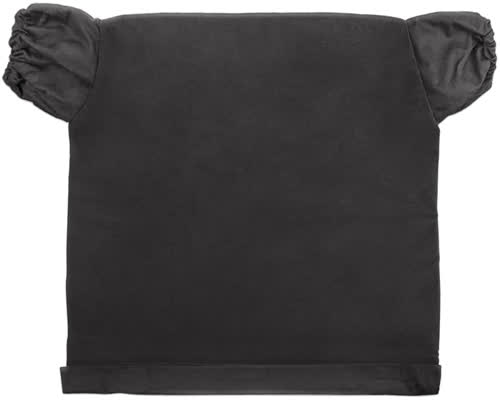
If you notice something suspicious that makes you hesitate to open the camera back (for instance, to clear a jam or remove a finished roll), do it away from light.
The changing bag acts as a portable darkroom for these situations.
It can also be used to load film spools into 8mm or 16mm movie cameras.
When rewinding your film, pay close attention to the motor sound or the resistance on the manual crank.
A change in pitch or resistance during rewinding indicates that the film leader has slipped off the take-up spool into the cassette.
If something feels off, head into the changing bag to inspect the film without exposing it to light.
Light Meter⌗
The final tool, essential for cameras lacking a built-in meter (or vintage cameras with an inaccurate aging meter), is the light meter.
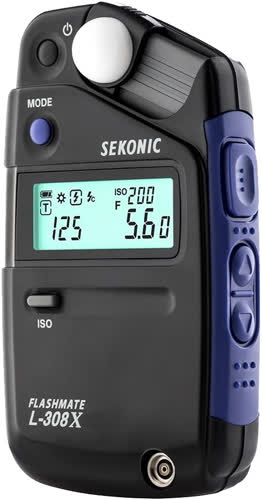
This device tells you the exact exposure parameters to set on your camera/lens for a properly exposed photo.
Dedicated handheld meters can be fairly expensive (around €200 for basic models), but they are invaluable when starting out.
However, there is an alternative way to get a light meter for a fraction of the cost or even free.
Your smartphone, if reasonably recent, has a light sensor on the front.
This sensor adjusts screen brightness according to ambient light.
You can find several light meter apps that leverage this sensor:
- Light Meter
- Luxmeter
Tips & Tricks⌗
Awesome! Now I can list everything I need and go buy my first camera!
Wait, what do you mean “Not yet”?!
Yes, unfortunately there is one final section left.
The one that will prevent you from ending up with a broken camera or wasting expensive rolls of film.
And with current 35mm color film prices, a mistake gets costly fast!
When Buying⌗
Choosing a Camera / Lens⌗
First, when acquiring your first camera, compare prices carefully across different models.
Due to social media trends, certain brands or models sell for far more than they are actually worth.
For instance, a Canon AE-1 Program SLR and a Minolta SRT101 SLR offer similar features, the same classic silhouette, and a nearly identical lens selection.
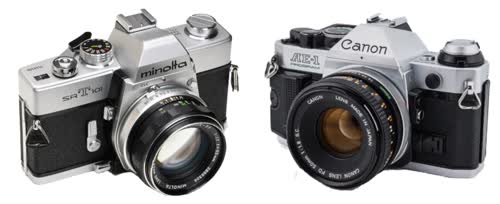
The Canon often sells for around €200, whereas the Minolta can be found for €100 (compared on eBay).
The price difference comes down to the popularity and hype surrounding the Canon model among collectors.
Second buying tip: lens choices.
I recommend sticking to lenses under 100mm; anything beyond that enters telephoto/wildlife territory.
- 24mm: Great for landscapes and architecture.
- 50mm: The best all-rounder, close to human visual perspective, making framing intuitive.
- 85mm: Excellent for portraits. Anything longer squeezes the frame too much for general use.
Since 50mm lenses are the most common, manufacturers offered them in various maximum apertures, up to f/1.4.
Prices are often very reasonable.
Detecting Damage & Future Repairs⌗
Once you choose a model, inspect the body and lenses carefully.
Over time, certain components age poorly and require maintenance.
First, check the shutter curtain condition. The more shutter actuations a camera has made, the more worn the curtain might be.
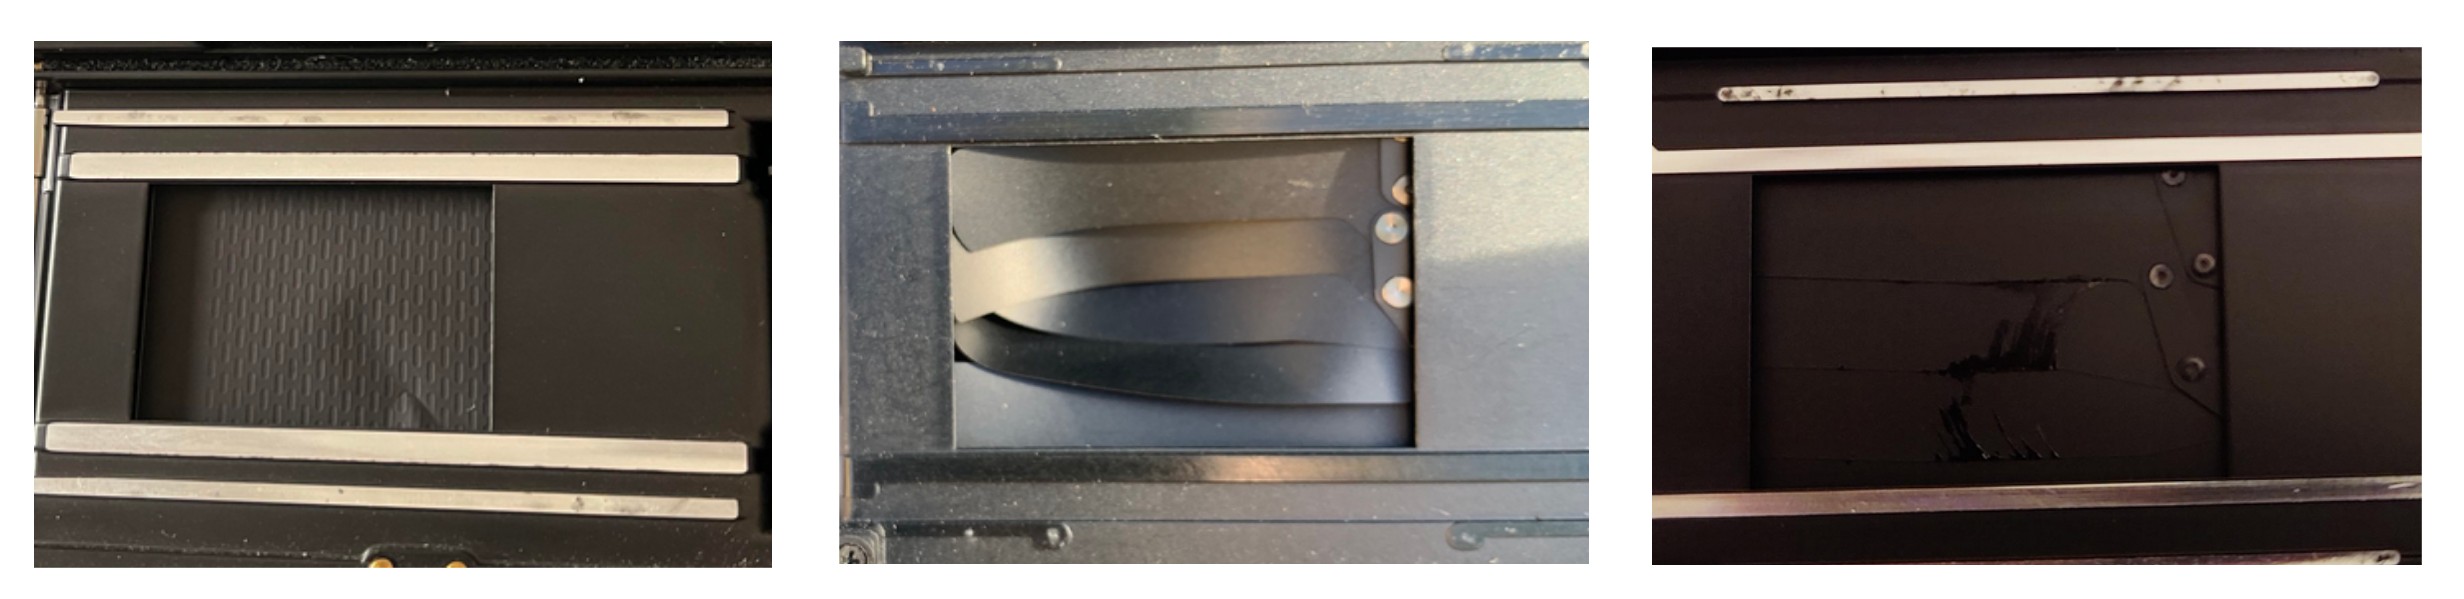
In the example above, we see 3 types of curtain damage:
- Wrinkled paper curtain
- Destroyed metal blade curtain
- Metal blade curtain covered in oil
You should also look out for mold/fungus traces on cloth curtains.
Even a curtain that looks fine visually can hide a mechanical defect. Fire the shutter with the back door open and listen closely to the mechanism.
These defects are easy to spot and difficult to repair. Walk away if you have any doubts.
Second area to check: the battery compartment.
It is common for previous owners to leave batteries inside during long-term storage.
Lithium and alkaline batteries degrade over long periods, oxidizing and leaking onto electrical contacts.
Either the leakage is localized and repairable with cleaning/contact replacement, or it worked its way inside the body and corroded internal wiring.
A quick clean (cotton swab + IPA alcohol) and a test with a fresh battery will tell you if the camera works.
Another element to inspect carefully: the lens.
Two main issues occur when a lens sits stored in a bag for years:
- Fungus / Mold
- Oil on aperture blades
Fungus can grow between glass elements in humid environments.
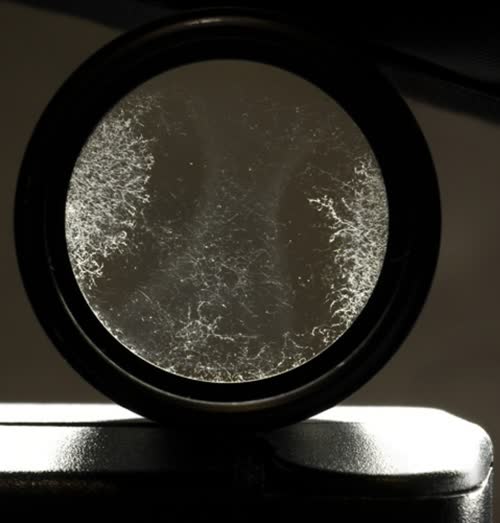
While UV light exposure over several hours can kill the fungus and reduce its appearance, there is no guarantee it won’t return or that the optical coating isn’t etched.
Regarding oil issues: temperature fluctuations during vertical storage can cause lubricant to migrate onto the aperture blades.
This might not directly ruin image sharpness, but it means internal mechanical components lack proper lubrication, and sticky blades won’t snap closed quickly enough during exposure.
A visual check of the aperture mechanism can also reveal misaligned blades. The opening created by stopping down should remain symmetrical/circular. An oval or distorted shape indicates a loose or bent blade.
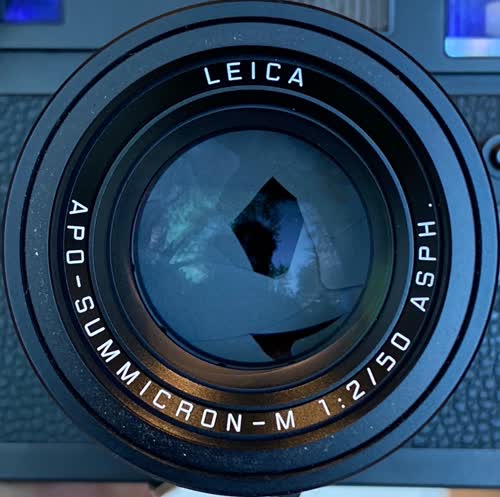
All the defects listed above can be identified through a quick visual check and test fires.
There is one last element you MUST check and replace if questionable.
Your film’s survival depends on it!
Light seals.
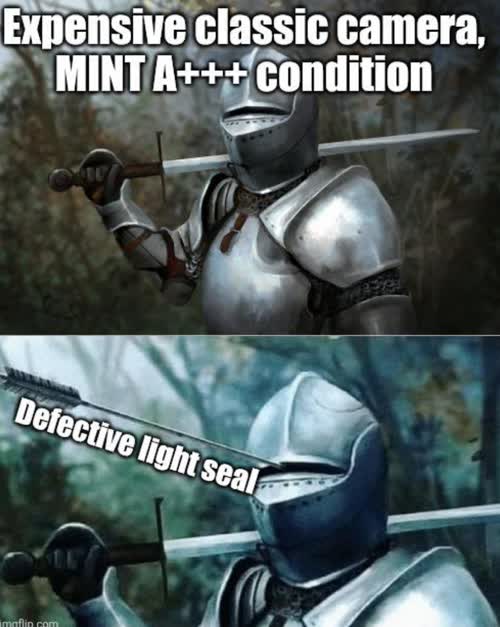
You could buy a pristine, virtually unused camera, but degraded light seals will ruin your photos.
The foam lining along the back door grooves deteriorates over time.
It becomes sticky, crumbles, leaks light onto your film, and leaves messy debris on the film surface or shutter curtain.
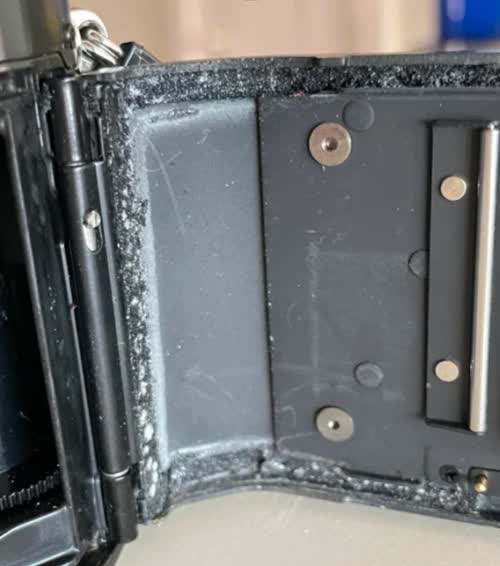
Fortunately, replacing light seals is easy using pre-cut foam kits or sheet foam.
In my opinion, unless the previous owner confirms recent seal replacement, go ahead and replace them anyway.
In any case, if you buy from a camera shop, remember you usually have a warranty. Shoot a cheap roll of B&W film (like Fomapan) right away and develop it to check for light leaks or mechanical flaws.
During Use⌗
Here are a few handy tips while out shooting.
First: frame counts listed on film rolls.
Boxes state 12, 24, or 36 exposures, but manufacturers often include a margin for 1 or 2 extra frames.
If your camera uses a manual film advance lever, you can feel when you reach the end of the roll by the increased tension.
If your camera features motorized advance, it typically has a torque sensor that automatically triggers rewinding at the end of the roll.
Speaking of rewinding: pay attention to resistance and mechanical sound. If in doubt, check inside a darkroom changing bag.
Don’t feel trapped by the film roll loaded in your camera. You can swap rolls mid-way by writing down the frame count on the cassette and reloading it later.
It would be a shame to load ISO 100 on a bright morning and be unable to shoot indoors or on a cloudy afternoon.
Final tip before moving to the next chapter: Overexpose.
Why would you want more light on your frame?
In Black & White and C-41 Color Negative film, you produce a negative image. Bright highlights become dark/dense on film, while shadows remain clear/transparent.
Clear areas mean little to no silver/dye remains, resulting in lost detail (shadow detail cannot be recovered).
Conversely, denser areas retain detail.
When scanning a negative, it is much easier to extract shadow and highlight detail from a dense, slightly overexposed negative than from a thin, underexposed one.
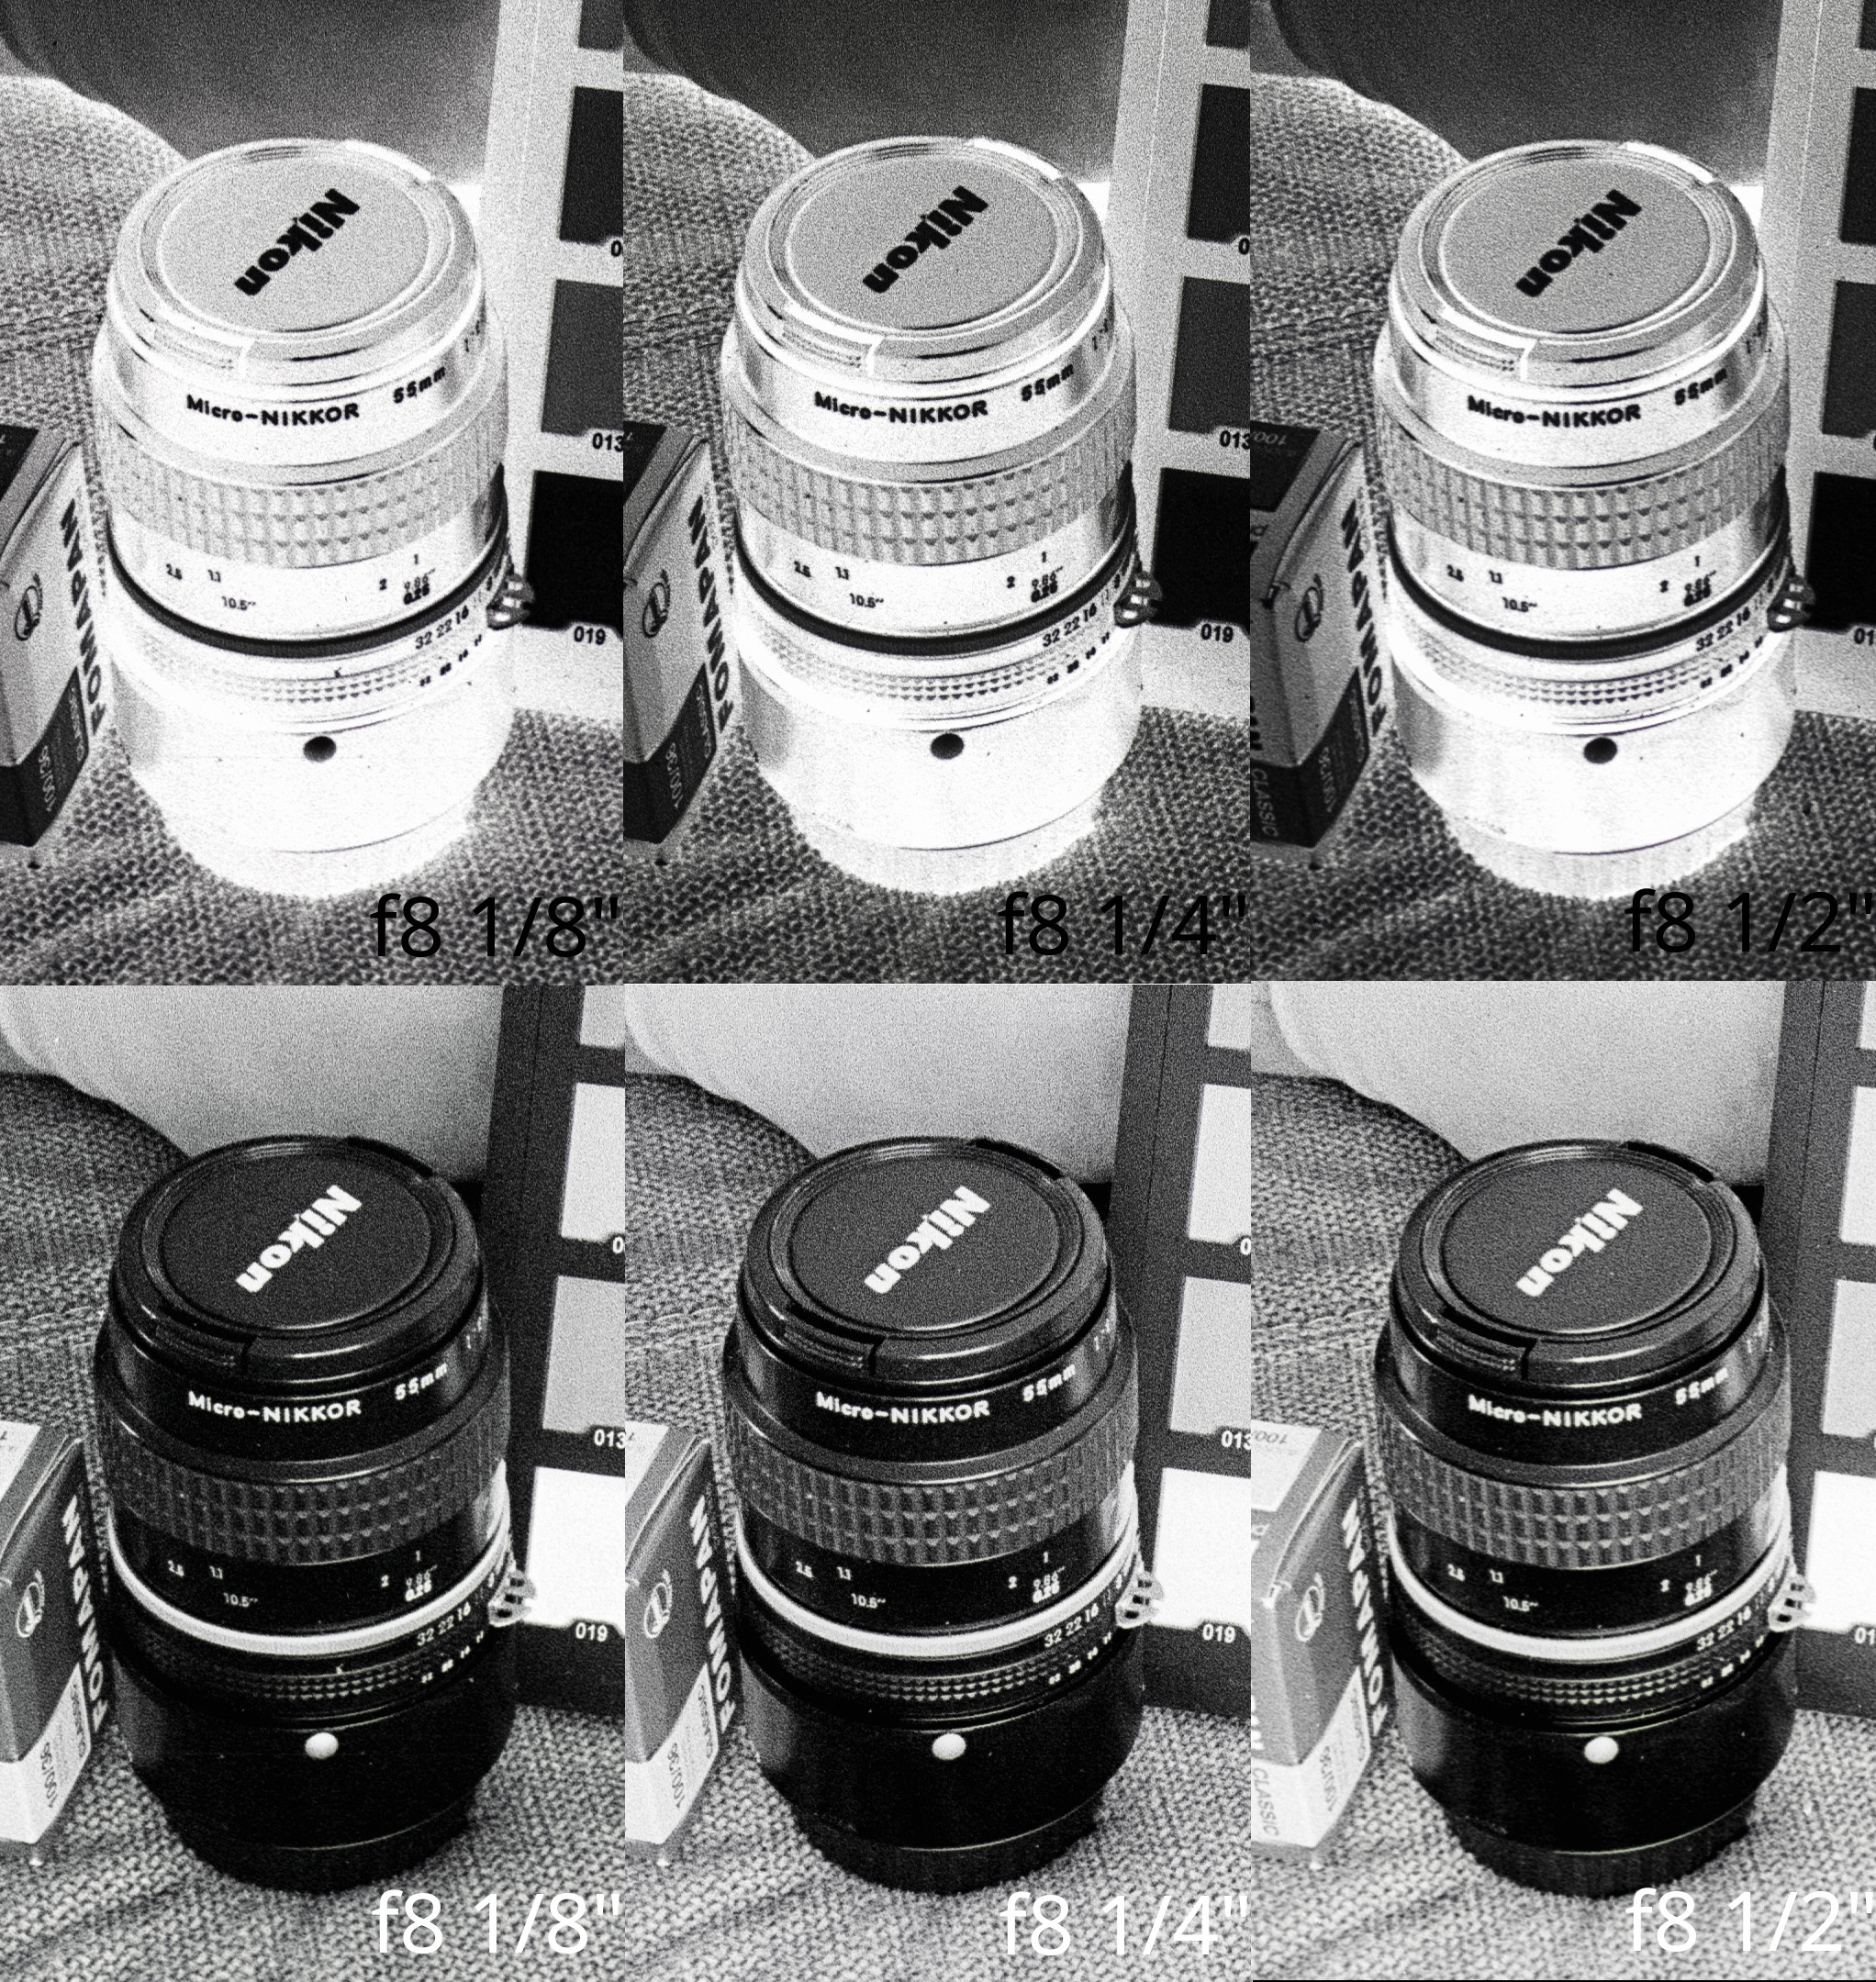
To illustrate this, here is an example comparing overexposure and underexposure.
The first image is our baseline (EV 0). The others represent 2x (+1 EV), 4x (+2 EV) light vs. 1/2 (-1 EV), 1/4 (-2 EV) light.
Overexposed
Underexposed
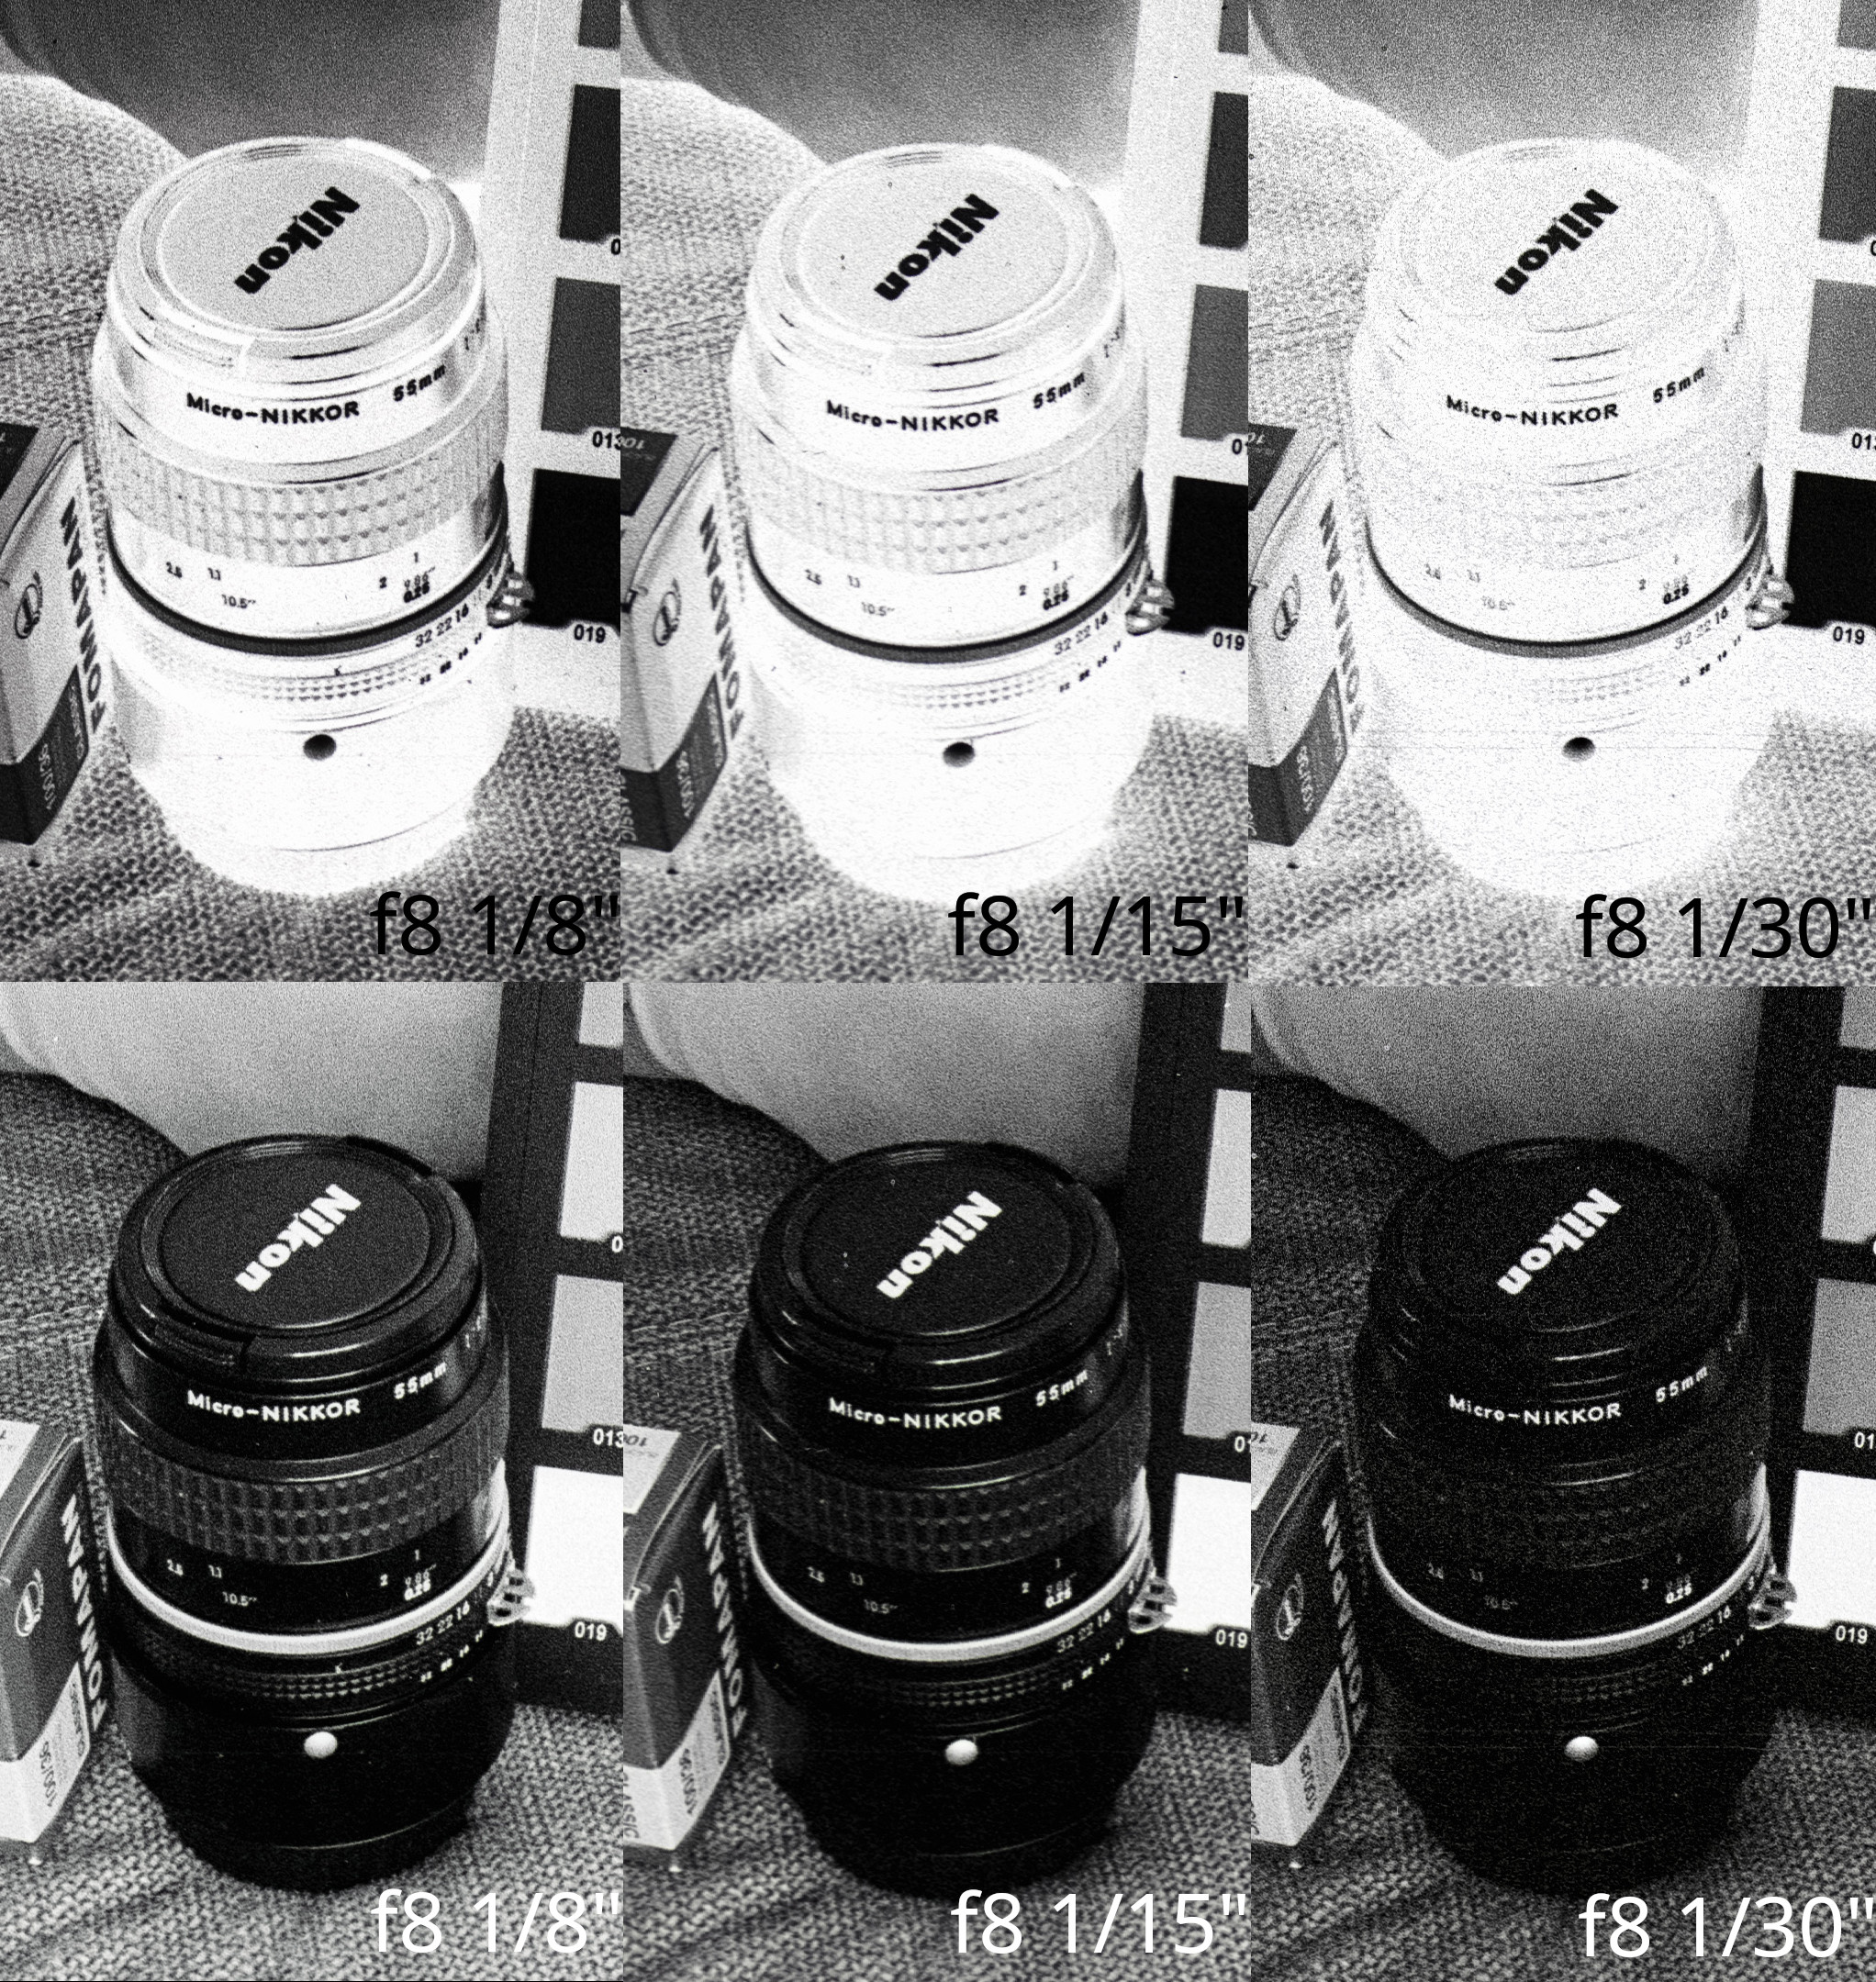
Notice the severe loss of shadow detail on the bottom ring of the lens in the underexposed example.
Conversely, overexposing preserves detail across the entire lens surface.
CHAPTER 3: Developing⌗
Different Types⌗
Earlier, I mentioned C-41 color film. This is just one of several film types and development processes.
There are 6 primary processes, ranging in popularity, divided into 2 categories.
Black & White Processes:
- Classic (Negative): The most widespread process; produces a negative image.
- Reversal: Used for slides and 8mm/16mm motion picture film. Produces a positive image directly.
- Craft / Alternative: Eco-friendly or DIY processes using everyday household products (e.g., coffee, energy drinks).
Color Processes:
- C-41: The standard process for color negatives.
- E-6: Reversal process for color slide (transparency) film, producing positive images directly.
- ECN-2: Motion picture film process. The film has a dark rem-jet anti-friction layer for cinema cameras, producing a color negative.
How It Works⌗
Each process relies on a specific sequence of chemical “baths.”
Black & White

Color C-41

Detailed Bath Breakdown⌗
Developer⌗
A strongly basic bath (pH around 10).
Composed of:
- A reducing agent that converts peripheral silver ions Ag⁺ into metallic silver atoms Ag⁰.
- An alkaline agent to raise the emulsion’s pH to around 10.
Stop Bath⌗
An acidic bath used to instantly stop the development process (pH 2.5 to 4.5).
Usually composed of acetic or citric acid.
It also protects the fixer bath, which loses efficiency if contaminated by an overly basic emulsion (pH > 7).
Fixer⌗
An acidic bath that converts unexposed silver bromide crystals AgBr into a water-soluble complex.
Unexposed areas (still containing AgBr) become completely clear/transparent.
Once fixing is complete, the film can be exposed to daylight safely.
Bleach & Fix (Blix)⌗
A color film emulsion contains two layered images: one formed by dye couplers (cyan, magenta, yellow) and one formed by black metallic silver.
This bath (near-neutral pH, 6.0 to 6.8) oxidizes the metallic silver (Ag⁰) back into silver salts.
The fixer component then dissolves these silver salts, leaving behind only the dye layers that form the color negative.
Wash⌗
A clean water rinse phase.
Its purpose is to wash away chemical residues from the fixer and bring the emulsion pH back to neutral (pH 7).
Stabilizer / Final Rinse⌗
A protective agent for the emulsion.
It acts as a protective barrier and includes a wetting agent to help water droplets slide off without leaving drying spots or streaks.
Where to Develop?⌗
Understanding chemical baths is great, but where should you actually develop your film?
At a Lab⌗
At a commercial lab! But how do you find one?
If you live in a city, you can find professional photo labs or community darkroom associations.
It’s a fantastic opportunity to learn from experts and ask for advice.
If you don’t have local options, mail-in online labs are available.
Using a lab guarantees professional-quality work.
Labs also offer convenient bundle packages (Development, Scanning, Printing).
Outsourcing saves time, allowing you to focus on shooting while waiting for results.
However, turnaround times vary significantly by film type. B&W development is often processed faster than color C-41, and niche processes take even longer.
Why does C-41 take longer in some labs?
It depends on batch volume. C-41 chemistry degrades quickly once mixed and is relatively costly. Labs often wait until they collect enough rolls to run a full batch economically.
Another drawback is cost.
B&W development typically costs around €7, plus shipping/postage if no local lab is nearby.
Color C-41 development costs around €15 per roll.
These flat prices apply whether your roll has 12, 24, or 36 exposures.
At Home⌗
Alternatively, you can develop at home.
Looking at the chemical baths above, you might think it’s complicated, but the process time is actually short:
- Black & White: 30–35 minutes
- Color C-41: 20–25 minutes
Add about 3 hours of hanging time to dry (completely hands-off), and processing two rolls takes very little active time. (Standard Paterson tanks fit two 35mm rolls at once).
Developing at home is faster than waiting on lab turnaround and guarantees total privacy for your photos.
While lab technicians are professional and discreet, lab processing always involves human quality inspection of exposed frames.
Another major benefit is cost per roll.
On the chemistry side, B&W development costs around €1 to €3 per roll when mixed at home.
However, developing at home requires an initial equipment investment (around €100 for a basic setup).
There is also a learning curve mixing chemistry improperly or mis-handling film can ruin a roll.
Finally, managing chemicals requires responsible waste disposal. Never pour used fixers or developers down the sink; store exhausted chemistry in containers and drop them off at your local municipal hazardous waste site.
Despite these factors, the satisfaction of developing your own film makes the effort worthwhile.
Developing at Home⌗
Equipment⌗
Essential home development tools:
- A changing bag (previously acquired)
- A film retriever / extractor (previously acquired)
- A developing tank with reels
- 1-liter storage bottles
- Graduated measuring cylinders (ideally 10mL and 1L)
- A thermometer to monitor bath temperatures
- Film drying clips / pegs
- An immersion heater / sous-vide cooker to maintain 36°C (97°F) for C-41 chemistry
Advanced semi-automated development devices exist:
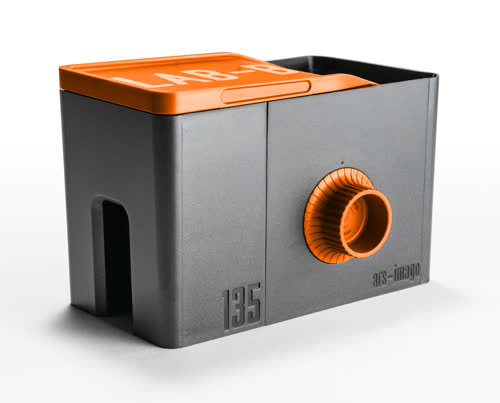
Ars-Imago Lab-Box
Cost: ~€160
Supports 35mm and 120 formats (via modular adapters)
Allows daylight loading, film cutting, and processing without needing a changing bag.
Pros: Compact & portable | Easy daylight loading | No darkroom needed
Cons: No built-in temperature control | Manual timing | Manual agitation (optional motor available)
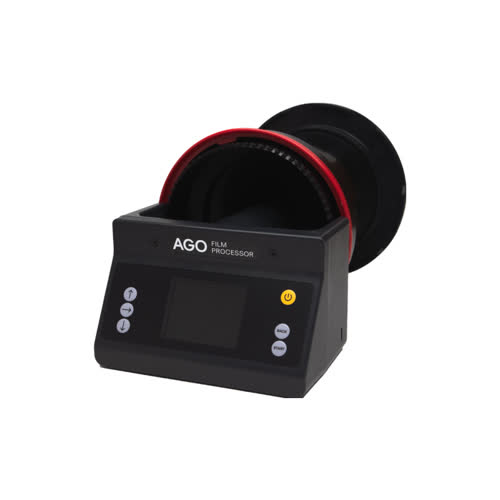
AGO Film Processor
Cost: ~€430 (without tank)
Automated agitation unit fitting Paterson-style developing tanks (up to 8 rolls of 35mm or 5 rolls of 120).
Pros: Compact | Semi-automated (preset recipe profiles) | Affordable | Wide tank compatibility
Cons: Does not heat water/baths directly
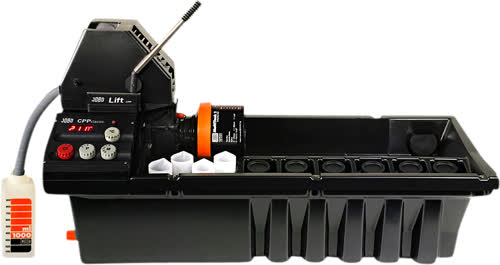
JOBO CPP Classic
Cost: ~€4,200 (without tank)
Professional rotary processor supporting all JOBO drums and sheet formats.
Pros: Semi-automatic, easy bath drainage, built-in water bath temperature regulation
Cons: High cost, large footprint, proprietary JOBO ecosystem
Chemistry Options⌗
Film chemistry comes in different formats:
You can choose ready-to-use / simplified kits, such as Ilford Simplicity or CineStill CS41 powder chemistry.
Or buy individual chemical bottles, such as ADOX products:
- Adonal (Rodinal): Developer
- Adostop: Stop Bath
- Adofix: Fixer
- Adoflo: Wetting Agent / Stabilizer
Buying individual concentrated chemicals is more cost-effective.
A developer bath ages/depletes differently than a stabilizer bath, so replacing them individually saves money.
Typical home workflow time breakdown:
- Loading film onto the reel (15 mins):
- Extract the film leader and trim cleanly.
- Place all tools inside the changing bag.
- Locate the reel entry guides and insert the film leader.
- Ratchet film onto the spool and cut from cassette.
- Assemble the light-tight tank.
- Chemical Baths (45 mins):
- Prepare and temper liquids.
- Pre-wash rinse.
- Developer bath, agitate, and pour back into bottle.
- Stop bath (same routine).
- Fixer bath (same routine).
- Water rinse for 5 minutes with active agitation.
- Final stabilizer / wetting rinse.
- Drying (3 hours):
- Remove film from reel and hang on line with film clips.
Digitization / Scanning⌗
Hardware⌗
Once negatives are developed, you need to digitize them to view, edit, and share them.
Hardware setups fall into 4 main categories:
- Amateur
- Semi-Pro
- Professional
- DIY (Camera Scanning)
Amateur⌗
Amateur setups use low-cost, ready-to-use daylight devices.
Smartphone film scanners:
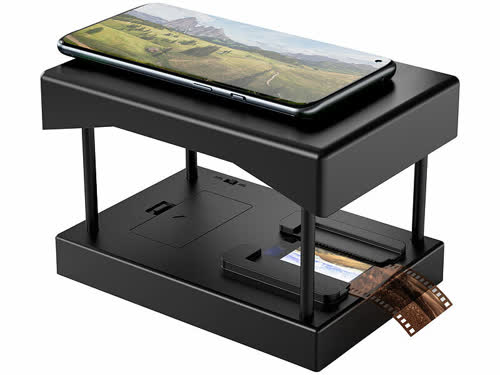
Cheap build
Image quality depends entirely on your phone camera/focus capabilities
Must be used in total darkness
Standalone standalone scanners with built-in digital sensors:
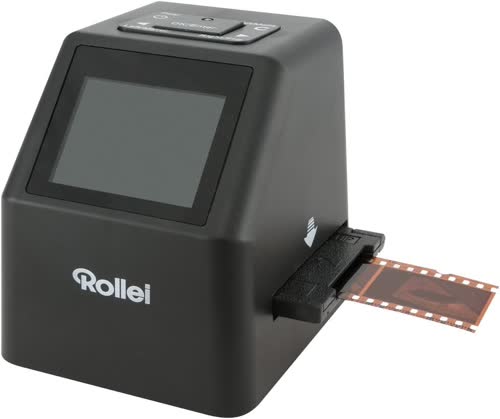
Low-to-moderate build quality
Lower optical resolution
Very fast preview and scan speed
Semi-Pro⌗
Flatbed film scanners with dedicated transparency units (note: standard document scanners cannot scan film negatives properly):
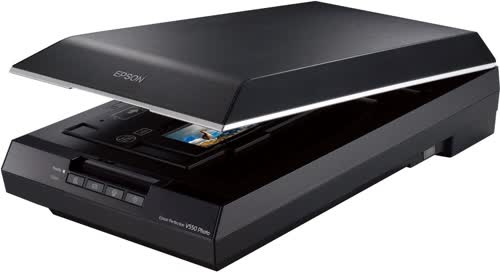
Enters good quality territory.
Scans full strips/sheets in batch automatically.
Affordable secondhand prices (around €400).
Professional⌗
High-end dedicated lab scanners from industry manufacturers:
Nikon Coolscan series (widely used in professional mini-labs):
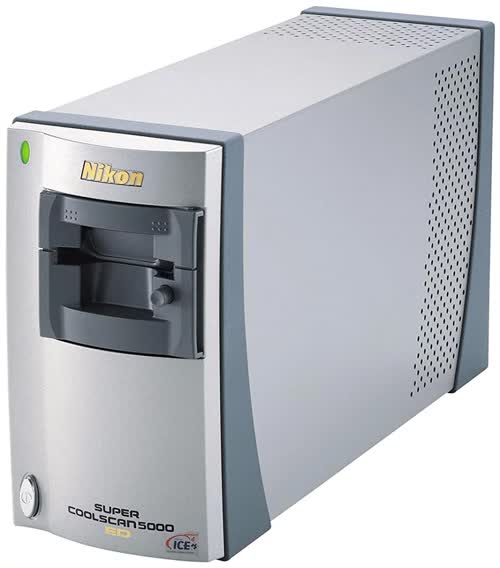
Outstanding optical scan quality.
Excellent color depth; performs multi-pass exposures (RGB + Infrared dust pass).
Built-in Digital ICE hardware dust/scratch removal for color film.
Multi-pass scans take longer (1–2 minutes per frame).
Multiple generations with light and professional versions; check connectivity (FireWire vs USB).
Large lab workstation scanners (Fuji Frontier / Noritsu):
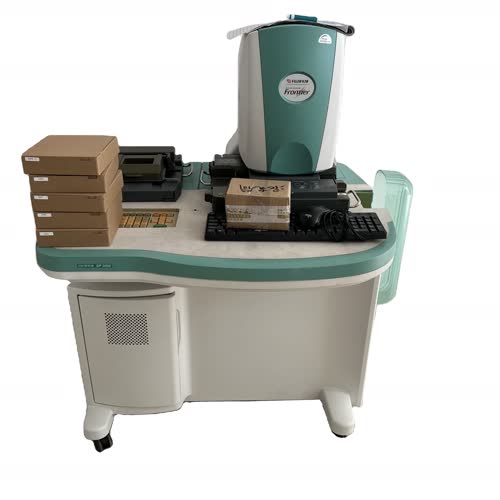
Exceptional lab-grade scan quality.
Multi-exposure scanning and dust removal.
Dedicated computer hardware with keyboard shortcuts (a downside if old hardware fails).
Heavy and takes up significant floor space.
DIY (Camera Scanning)⌗
Using a digital camera you already own paired with a macro lens and a film holder:
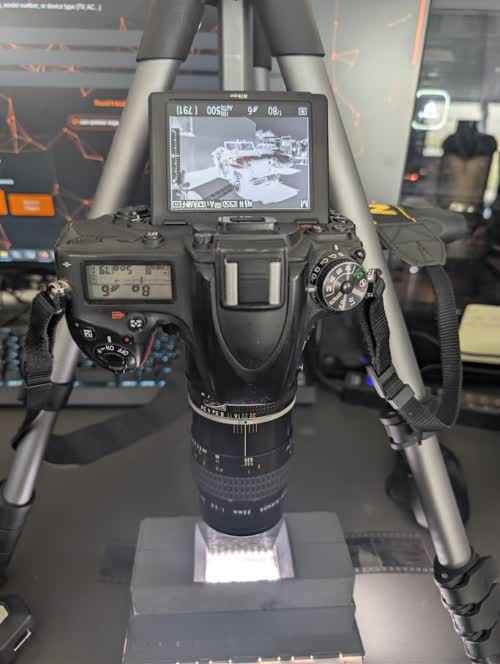
Low additional cost (if you already own a DSLR/mirrorless camera and a 1:1 macro lens).
Fast workflow: one shutter click per photo.
Full focus and raw exposure control.
Allows focus stacking or multi-shot stitching to increase resolution.
Requires stray light control (dark room or lens hood attachment).
Software⌗
You can use bundled scanner software (e.g., Epson Scan), but two dedicated third-party options offer superior control:
- VueScan
- SilverFast
For processing color negatives, 3 popular software options exist:
Adobe Lightroom⌗
Lightroom lacks native negative inversion tools. Standard tools require manual curve inversion and color tweaking.
A popular paid plugin called Negative Lab Pro automates negative inversion using calibrated film profiles.
It costs $99 (includes minor updates) and can be activated on up to two machines.
Darktable⌗
Darktable is an open-source, free alternative to Lightroom.
It includes built-in tools (like the Negadoctor module) designed for converting negative scans without extra plugins.
GIMP / Photoshop / Affinity Photo⌗
Standard image editing software works fine for processing individual negatives, but manually converting full rolls frame-by-frame is time-consuming compared to batch lightroom workflows.
Conversion Workflow⌗
General steps for processing negative scans:
- Flip / mirror the image horizontally if scanned upside down. (These may have been scanned upside down)
- Convert to grayscale mode for black & white film scans.
- Sample white balance using a color picker on the unexposed film border (film base).
- Invert color curves.
- Fine-tune exposure, contrast, shadows, highlights, and crop.
CRITICAL: Properly archive your physical negatives once processed!
Store negatives in archival glassine or print file sleeves inside a binder (7 strips of 6 frames per page).
Negatives are your original high-resolution master copies. As scanner technology or camera scanning skills improve, you can always rescan them for higher detail.
Printing⌗
Darkroom silver halide printing is the ultimate physical phase of analog photography.
It requires dedicated equipment and a light-tight room.
Equipment⌗
- Safelight: Red inactinic safelight bulb, allowing vision without fogging B&W paper.
- Processing Trays: Shallow trays for developer, stop, fix, and water wash.
- Darkroom Timer: Non-backlit timer for exposure accuracy.
- Print Tongs: Long tongs for handling wet prints safely.
- Drying Line & Pegs: For hanging developed prints to dry.
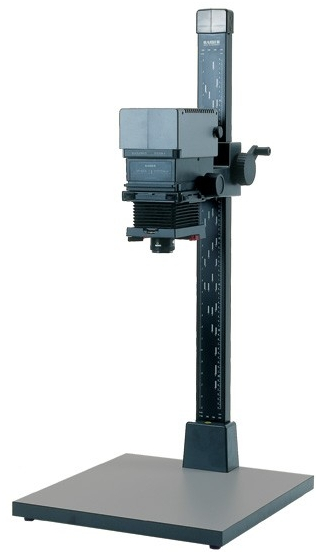
- Enlarger: The core projection device.
Chemistry⌗
For black-and-white photography, we’ll stick with the same chemicals and therefore the same bottles as those purchased for photo development.
For color, we’ll switch to the RA4 process.
Similarly, it’s best to buy chemicals individually rather than in packs.
I can recommend the Adox brand, which offers all the necessary solutions:
- Adonal or RA-4 Part A and RA-4 Part B for development
- Adostop: To stop the developer
- Adofix: To fix the emulsion
- Adoflo: Stabilizer and protector
Printing Process⌗
The process is the same for B&W and Color. Only one step will take more time
- Mount the negative in the enlarger carrier and frame/focus onto the easel.
- Retrieve photo paper from its light-tight box under safelight conditions.
- Make a test strip:
- Expose incremental strips of paper at increasing time intervals (covering sections with cardstock).
- Process through chemical baths to evaluate optimal exposure time.
- Expose the full sheet using optimal time (and 3 color filters settings for color printing).
- Process print through Developer → Stop → Fix → Wash trays, then hang to dry.
CHAPTER 4: Costs⌗
Photography⌗
Camera
- Point and Shoot: €35–€50
- SLR (Reflex): €100–€150
Accessories
- Changing bag: €25
- Film retriever / extractor: €10
Film
- Black & White:
- Fomapan 400: €5.75
- Ilford HP5 Plus 400: €8.90
- Color:
- Kodak Ultramax 400: €12.40
Overall, budget an average of €100 to get started with film photography.
Developing⌗
Equipment
- Changing bag: €0 (already owned)
- Film retriever: €0 (already owned)
- Ilford Film Processing Starter Kit: €156 (includes an Ilford B&W chemistry kit)
OR
- Developing tank: €33
- Film drying clips / pegs: €15
- Storage bottles (x3): €20
- Graduated cylinders: €10 for a set
- Thermometer: €10
Chemistry
- Ilford B&W Simplicity Starter Pack: €28 (€14/roll)
- Individual B&W chemistry (bottles): €28 (€1.40/roll)
- CineStill CS41 Color Powder Kit: €40 (€1.67/roll)
Two use cases and investment levels can be considered.
In both scenarios, factor in the basic equipment cost.
Occasional: Ready-made starter kit (€156), buying Ilford Simplicity or CineStill chemistry single-use packs as needed.
Regular: Individual equipment piecemeal (€88 total) paired with individual concentrated chemistry.
Darkroom Printing⌗
Equipment
- Processing trays / dishes: €10
- Safelight bulb: €20
- Darkroom timer (non-backlit): €5
- Print tongs: €15
- Storage bottles (x3): €20
- Graduated cylinders: €0 (reused)
- Thermometer: €0 (reused)
- Enlarger: €30–€50 secondhand for B&W; €100–€150 for Color
Chemistry
- Individual B&W chemistry: €28 (or €0 if already acquired for film)
- Color RA-4 chemistry: €30
Photo Paper (5x7" / 12.7x17.8cm)
- Black & White: €29 for 100 sheets (€0.29/photo)
- Color: €28 for 100 sheets (€0.28/photo)
Saving Money⌗
Cameras⌗
Save on cameras by browsing garage sales, flea markets, and local second-hand fairs.
Check your local thrift shops (like Emmaüs in France), which often have donated camera gear and lenses.
Finally, ask family and friends if they still have old cameras stored in a closet from old family gatherings.
Film⌗
For film, consider buying expired stock.
As a general rule of thumb, overexpose expired film by one stop (+1 EV) per decade past its expiration date.
You can often find discounted stock without compromising image quality if compensated properly.
Another tip: 35mm (135) is the most common format and the cheapest to manufacture. Saving money on 35mm film is easier, especially as new manufacturers enter the market to challenge Kodak’s near-monopoly.
Finally, bulk loading from 100ft (30.5m) or 50m spools offers massive savings.
This requires a bulk film loader so you can roll custom exposure lengths into reusable 35mm cassettes.
One large spool produces many individual rolls.
The price difference can be significant:
Example: A 100ft (30.5m) bulk roll of Fomapan ISO 400 costs ~€62.
This spool yields eighteen 36-exposure rolls (with ~0.4 roll left over).
Buying 18 factory-packaged 36-exposure rolls costs 3x 5-packs (€27.90 each) plus 3 single rolls (€6.45 each) = €103.05.
Total savings: €41.05
Certain motion picture stock (like Kodak Vision3 500T) is only distributed in bulk spools.
Resellers re-spool it into individual cassettes under custom branding at premium markup prices:
CineStill Tungsten 800T: ~€21 for 36 exposures
CineStill Dynamic 400D: ~€23 for 36 exposures
Developing⌗
The biggest savings come from developing at home.
For Black & White, buy individual concentrated chemistry in bottles instead of single-use sachet packs. This lets you spread out developing sessions throughout the year without wasting chemistry.
For color processing, favor powder-based chemistry kits. Powder chemistry is easier to split/share, reduces shipping weight, and can be vacuum-sealed for long-term shelf life.
SOURCES AND USEFUL LINKS⌗
Youtube Channels⌗


- Nick LoPresti : His videos on scanning and development techniques.
- Technology Connections : His various videos about cameras.
- Sweet Lou Photography
Interesting Videos⌗
- C’est pas Sorcier : “Tu veux ma photo ?"
- The Birth of Photography: Drawing With Light (and silver iodide)
- Making Film Reveal its Image: the B&W Development Process (Photography Part 2)
- I Developed Film in a Jägerbomb (It Worked)
Websites⌗
- Filmdev.com : Developing Recipes.
- Digit-Photo.com : Website selling photography equipment and film. Brick-and-mortar store in Metz.
- My Film Photography Gallery